Halloween Photo Booth using Linux and i3
andrew@paon.wtfA Fun Idea
Last Monday was Halloween. Around 1pm I was sorting candy and brainstorming ways to liven up the evening. I had the idea to make a Halloween photo booth; something that would allow kids to walk up, see themselves in their costumes, and have a picture printed.
Planning
Given the limited time, I wasn’t sure if I could pull it off. I took some time to think through my options for a fast build. I started with a mental inventory of the relevant hardware I had around:
- A small collection of long-ignored Raspberry Pis and camera modules
- My Windows gaming PC
- My main work laptop: a thinkpad running Gentoo Linux
- An Android tablet
- My 2016 emoji-bar Macbook Pro (AKA the worst computer ever made)
- A black-and-white HP printer
I didn’t want to print out grayscale photos on printer paper, so I knew for sure I’d need to buy a photo printer. That’s OK, because I’ve been looking for an excuse to get one for ages. My first idea was to find some off-the-shelf photo booth app for Android, prop my tablet up on a table, and call it a night.
Unfortunately I couldn’t find any apps that fit my requirements. There are many “photo booth” apps on the play store, but most have awful reviews, and none that I looked at seemed to support printing.
Next I considered using Photo Booth on Mac. It seemed like it could make for a nice picture-taking experience, but the user guide doesn’t even mention printing. Does anyone print photos anymore?

I knew I could use Photo Booth to take a picture, save it, and manually print it from Finder. But this is not the UX I wanted; I wanted a photo booth! I wanted to press a single button to take and print a picture. I needed flexibility and scriptability, so it was time to go to Linux.
Proving the Concept
I opened my laptop and did some experimenting. First I installed Cheese. It worked great for taking pictures, but it requires a manual step to save them. Same situation as Photo Booth.
Still, I noticed that when I closed and reopened the application, my camera roll persisted at the bottom of the screen.
Those images must be saved somewhere; if I could just figure out where I might be able to poll the directory and print any new files that appear.
I ran Cheese under strace:
strace -y -f -e trace=open,write cheese
I took a picture, then watched to see which files were written. I found the thumbnails right away:
[pid 22241] write(44</home/ajpaon/.cache/thumbnails/normal/9bb1912c705c141a9126fca128c1dbe5.png.SXVZU1>, "\211PNG\r\n\32\n\0\0\0\rIHDR\0\0\0\200\0\0\0H\10\2\0\0\0\261\347j"..., 4096) = 4096
[pid 22241] write(44</home/ajpaon/.cache/thumbnails/normal/9bb1912c705c141a9126fca128c1dbe5.png.SXVZU1>, "\31\273\260P(\227\245RU\37]V\271\f\323\10$\367\362\310\330\205\210\235\254\21\332%T\31d\301"..., 4096) = 4096
[pid 22241] write(44</home/ajpaon/.cache/thumbnails/normal/9bb1912c705c141a9126fca128c1dbe5.png.SXVZU1>, "\263\237\346Ow\217\244l\315`S\16\2\320\234\251@Y\363.\275\356N\334\36\270F\373{\v\3604"..., 4096) = 4096
[pid 22241] write(44</home/ajpaon/.cache/thumbnails/normal/9bb1912c705c141a9126fca128c1dbe5.png.SXVZU1>, "\0211\32\203\364`_A\231\260\210\204\332<L_?\36V\33www\337\375\361/\353\332\310\214\310"..., 2887) = 2887
Unfortunately the thumbnails were much too small for printing:
$ file ~/.cache/thumbnails/normal/9bb1912c705c141a9126fca128c1dbe5.png
/home/ajpaon/.cache/thumbnails/normal/9bb1912c705c141a9126fca128c1dbe5.png: PNG image data, 128 x 72, 8-bit/color RGB, non-interlaced
I didn’t notice anything else interesting in the logs so I moved on to another approach. If I had spent a bit more time looking I might have noticed this line a bit further up:
[pid 22269] write(44</home/ajpaon/.gnome2/cheese/media/2022-11-02-104118.jpg.DJH0U1>, "\377\330\377\340\0\20JFIF\0\1\1\0\0\1\0\1\0\0\377\341\0\304Exif\0\0II"..., 104242 <unfinished ...>
Sure enough, this is the actual full-resolution image. But this is not a story of how to do something the right way. This is a story about how I actually did it.
I decided to put the pieces together myself. I wanted:
- A window displaying the webcam feed at all times
- A way to dump the current frame to an image file
- A way to print an image
I knew if I could get these pieces working independently then I could script them together into a single process.
Webcam feed? Easy.
$ mplayer tv:// -tv driver=v4l2
Dump the current frame to PNG? Easy.
mplayer -vo png -frames 1 tv://
Print an image? Time to run to Best Buy.
I came back with a Canon SELPHY CP1300. I was a bit skeptical of it because it really emphasized printing over Wi-Fi, but the store didn’t have a lot of options. Since we don’t have Wi-Fi on my driveway, I was hopeful it would still have a USB port. It does, it just doesn’t come with a cable. Fortunately I already had the one I needed.
Installing CUPS
I’ve used CUPS in the past and found it difficult, so I was not excited to try again. But it seemed to be my only viable option for printing from the command line, so I installed it with USB support and started the service. The Gentoo Wiki has a good page on printing that I mostly followed.
sudo USE=usb emerge -atv net-print/cups
sudo rc-servce cupsd start
I could see my printer name in CUPS but it didn’t come with the right driver. I flailed around online for a bit, looking for solutions and eventually tried installing Gutenprint, which provides open-source drivers for all sorts of printers.
sudo emerge -atv net-print/gutenprint
This made the correct driver immediately available to CUPS.
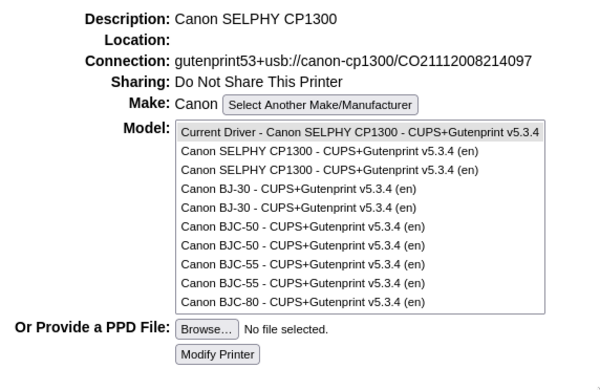
I printed my first, beautiful test page.
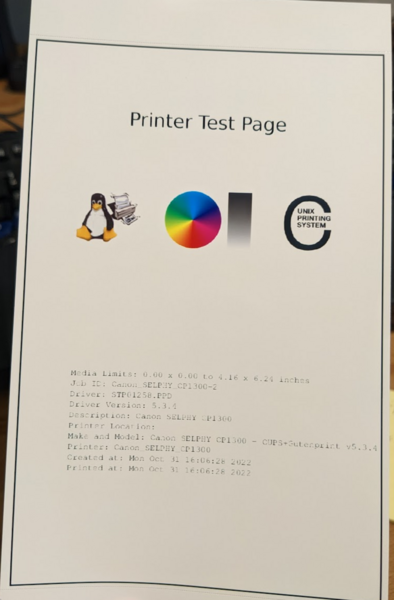
Getting CUPS working was probably the slowest part of the build, but most of that was learning time. I tried a couple dead ends, like trying to print using a random pre-installed driver. But in the end it was as simple as installing two packages and following the setup wizard. I think this would be a lot easier if I were to do it again.
Putting it all together
Next I wrote two bash scripts: start-kiosk.sh and take-and-print.sh.
This post on Ivar Thorson’s blog was a huge help in writing them.
run-kiosk.sh
#!/bin/bash

mplayer tv:// -tv driver=v4l2
take-and-print.sh
#!/bin/bash

set -e

# Take the picture after a short delay
sleep 1

# mplayer capture always saves the file as "00000001.png" in the current dir
INFN="00000001.png"
FN="converted.png"

mplayer -vo png -frames 1 tv://

# back up the image
SAVE=$(mktemp -p "/tmp/images")
cp "$INFN" "$SAVE"

# rotate it to fit the paper
convert -rotate '90>' "$INFN" "$FN"

# print
lpr -o resolution=600dpi \
  -o media-type=GlossyPaper \
  -o media=Custom.5x7in \
  -o orientation-requested=3 \
  -o size=one-sided \
  -o fit-to-page \
  -o color-model=CMYK \
  -P Canon_SELPHY_CP1300 \
  "$FN"
I ran run-kiosk.sh - Success!
I ran take-and-print.sh - Failure.
v4l2: ioctl set format failed: Device or resource busy
v4l2: ioctl set mute failed: Invalid argument
v4l2: 0 frames successfully processed, 0 frames dropped.
It seems like I can’t stream the webcam in one process and capture from it in another. My solution was to kill the first process before capturing, then restart it.
take-and-print.sh
# New capture code:
killall mplayer || true
if mplayer -vo png -frames 1 tv:// 2>&1 | grep "Device or resource busy"
then
  exit 1
fi

# At the end of the script:
exec "./run-kiosk"
This kills the webcam feed right before the picture is taken and restarts it a moment later. I thought it might look weird, but it reminds me of a camera shutter closing, so I’m happy with it.
Kiosk
I’ve used i3 in the past to make simple “kiosks”.
It’s nice for this purpose; you can use it to launch graphical applications at login and run arbitrary commands in response to keypresses.
I created a new user called kiosk.
sudo useradd kiosk
sudo passwd kiosk
And I gave it this simple i3 config:
set $mod Mod4

# Keybinding to restart the kiosk
bindsym $mod+g exec '/home/kiosk/run-kiosk'

# Press space to take and print
bindsym space exec '/home/kiosk/take-and-print.sh'

# mod+q to log out
bindsym $mod+q exit

# Start the kiosk when logging in
exec '/home/kiosk/run-kiosk'
If you are interested, you can see the full code on Sourcehut.
Trick or Treat!
After just a bit of debugging, I decided the booth was ready for primetime. I set it up outside with our candy and had a great night of taking pictures for kids and their families.
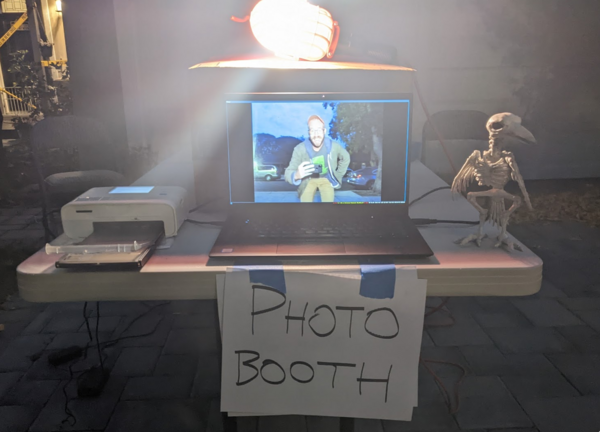
The spirits of the dead must have been watching over me that night, because, incredibly, I had no software issues whatsoever. I held my breath every time I took a picture, but every time it started printing right away. No embarrassment!
Takeaways
Even though I only worked on this for a couple hours, I almost quit several times.
- I almost abandoned the idea immediately when it seemed too ambitious for an afternoon.
- I almost gave up when I got to Best Buy and wasn’t sure which printer was going to work.
- I almost gave up when I was struggling to get printing working on Linux.
- I even almost gave up before bringing my setup outside because I thought people might not like it.
But somehow I managed to pull through and I’m very glad I did. Every single person that stopped for candy also wanted to get their picture taken. People were delighted and many told me ours was their favorite house of the night.
Some people didn’t even realize I was going to print them a photo. I had to stop them from walking away without it. They were happy just to have their picture taken!
Some people would have even paid for this. I had multiple people ask “how much?” But the only payment I need is positive feedback.
A few favorite quotes of the night:
- “This is hecka dope! Did you invent this?”
- “Only in Silicon Valley”
- “Do you work in tech?”